Showing posts with label rear hub. Show all posts

Wednesday, May 29, 2019

Rear Hub – Handbrake shoes

After test fitting the rear hub and prop shafts it is time again to place another order with SNG Barratt. This ordered includes the following
  • 1x Pair of rear discs (part number JLM1249)*
  • 1 x Pair of rear brake pads (part number JM1282)*
  • 1x Pair of handbrake shoes (part number JLM2209)
  • 4x Grub screws for discs (part number SF605047J)
  • 2 x Prop shaft nuts (part number JZN100035)
  • 14 x Shims (part number C16621)
  • 2 x rear brake caliper seals (part number JLM2200), as I ordered the wrong parts last time!
*update: the rear brake pads and discs are the wrong part number for a late XJ40 like mine, a problem I noticed later and have since resolved, but that is a cockup for a future post. 

Parts ordered from SNG Barratt. 

Let the Assembly Begin

With the new parts from SNG, the topic of this post if the final stage in rebuilding the rear hubs with their handbrake shoes. The new parts from SNG are only half of the parts I required for this stage, but after a quick rummage through my box of donor parts I found the remaining items; 
  • 2x painted splashed shields
  • 2x partially rebuilt hub carriers (with bearings and races)
  • 8x no. 8 Allen headed bolts and washers
  • 4x locking pins and corresponding springs
  • 4x hand brake retaining springs 
  • All components for 2 handbrake shoe adjusters 
  • 2x handbrake cables supplied by AK

Having found all the parts, I began as always with laying them out on the floor. 

Required components to rebuild rear handbrake.
I started with the two biggest items, the hub and the splash shield. The AK manual states that if the splash shield is damaged you can cut it down prior to fitting to the hub. You still require the inner circular section, as this holds the handbrake shoes to the hub, but the outer annulus is intended only to keep dirt and grit from the brake disc and so is not essential (especially for a relatively low mileage/good weather only kit car). Since  both of mine were in a decent condition I chose to leave them as a complete unit, as they will offer some protection. The one modification I did want to consider was a way of reducing the chance of corrosion between the shield and hub (a serious problem I found whilst cleaning these donor parts). To avoid water ingress into this area I decided to put a bead of RTV around the edge where the shield mounts to the hub carrier. The downside to this approach is that it will make it harder to remove the shield later if needed, and could also trap and keep water in this gap, if it gets in, which would make any corrosion worse. However, I decided to chance my arm that water would not get trapped in this gap and prevention was a better approach. 

RTV on hub carrier and the splash shield installed.

With a quick bead of RTV the splash shield was lowered over the hub and secured to the hub carrier by 4 no. 8 Allen headed bolts and washers (from the donor car). There was a considerable buildup of paint in these threads and so I had to run the bolts in, in stages which regular removal and cleaning of the threads. Finally, to ensure these bolt will not vibrate loose, I gave each of them a drop of locktight. 

The next step is to assemble the handbrake shoe adjuster. The cleaned adjuster (I know it doesn’t look it) is assembled from three components as shown below. Each mating surface is given a liberal coating of copper grease and rotated several times to ensure an even coating on all surface. The adjuster thread is then screwed fully into the cogged central piece before the cap placed over the top. This makes the assembling of the shoes and springer easier (or at least possible). 

Assembled adjuster.

Using the rebuilt adjuster and the pair of the springs I test assembled these with the new shoes. I did this away from the hub to make my first attempt as easy as possible as the springs are very strong and I didn’t want to scratch the fresh paint on the shield. 

As throughout this build, all metal-metal contact faces get a liberal coat of copper grease. This starts with the recesses in the shoe formers, where the adjuster and hand brake mechanisms slot into. However, the important thing to remember is that the copper grease should never touch any of the braking material and so careful application of the grease with just enough being applied is key. I know its common sense not to put grease on brake pad/shoes… but thought worth stating. 

Handbrake shoe with springs and adjuster. 

Having built up the first brake shoe the next step is to consider the handbrake mechanism. I was pleased to see that I still had the all-important small stud, which is used to secure the handbrake cable to this assembly. I was fearful of losing this and then struggling to find a new one. Before fitting this item, I ensured that all the metal to metal contact surfaces had a good coat of copper grease. This was certainly a messy job and the part required a good wipe down afterward. Despite this, the internal pieces certainly moved a lot smoother. I did leave some excess copper grease on the inside surfaces casing to avoid future ware. 

Handbrake mechanism with a light coat of copper, grease were required.

The last part of this assembly which needs to be trial fitted is the mounting of the hand brake cable. The recessed section on the rear of the hub was slightly too small for the mating surface on the handbrake cable. The solution was a small amount of filling on the handbrake cable matting surface to achieve the desired fit. 

Slightly filled down recessed lip on handbrake cable.
With this part prepared there is nothing left for it and its time to install the shoes onto the hub. The XJ40 build manual suggests applying small amounts of copper grease into the six contact points on the shield. My concern is not to apply to much grease and run the risk of this contaminating to the shoes. 

Brake shield with copper grease applied to high spots. 
With the shoes and springs assembled these are then placed over the central hub section and onto the splash shield. The next step is to fit the main handbrake mechanism. This starts by passing the handbrake cable up through the back of the hub carrier and through the tube in the splash shield. On the original donor car, there was a plastic retaining clip which I had kept, that sat between the shield and the hub carrier to keep this cable in place. However, this does not seem to fit onto the AK cable, and so can be discarded (Wish I hadn't spent 30 mins cleaning these two clips now). 

Handbrake cable being passed through hub and brake shield.
With the cable passed through the hub, the end of the cable can then be secured to the handbrake mechanism bypassing the small cylindrical stud through one arm of the mechanism and the end of the handbrake cable. This stud is retained in place solely by the overhang of the mechanisms outer casing, and so only work secured when in its 'normal' position. 

Partly assembled handbrake shoes
Each recessed end of the mechanism then gets a coating of copper grease, before slotting each end in turn into the corresponding cut out on the brake shoe. This is made a little easier by the fact the shoes can still lift up and rotate slightly, but is still a pig of a job to do thanks to the tension from the springs. 

With the handbrake cable and mechanism attached the final step is to add the hold-down pins to keep the pads on the splash shield. This is a simple job of placing each pin through a corresponding spring, then a hole in the shoes and finally the shield. These are then secured in place by pressing them down on the pin with a no. 5 Allen key and twisting to lock. Then the tension provided by the spring keeps the pin in place.
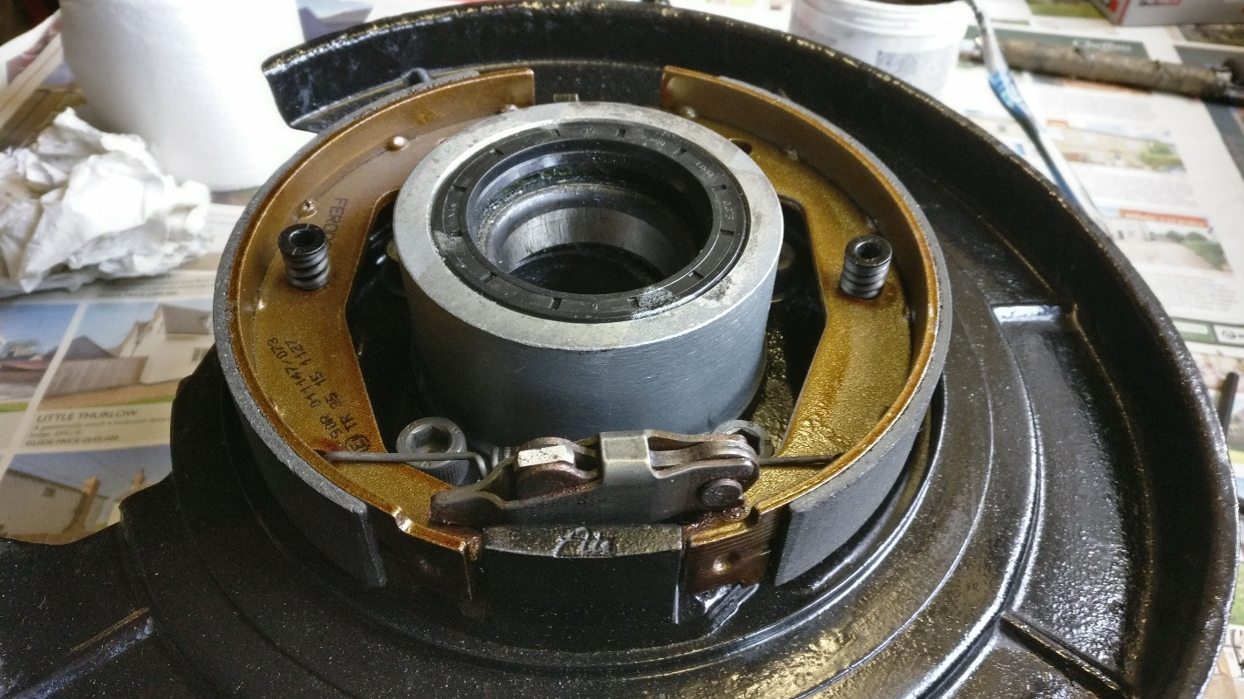
Assembled rear hub with handbrake shoes.
As someone who always wants to understand how and why things work, I must confess it took me a while to fully comprehend how the handbrake mechanism functions. So what I understand happens is when the cable is pulled, it pulls the inner section of the mechanism inboard towards the shield. Due to the arrangement of the pivot and the cable mounting location, as the cable is pulled, it has the effect of increasing the length of the mechanism, which in turn pushes the shoes out towards the drum. It also applies an outboard force (away from the shield) onto the shoes, which I guess is another reason for the pins/springs fitted in the last step. 

With the rear handbrake shoes fully assembled onto the hub, the last step is to pull the handbrake cable and check it all works. For that and a time-lapse look at the above build process, I have added the following video.... yeah video time!!!.


The process is then repeated to assemble the other hub. I must confess that despite the challenges of the springs, this is a rewarding job. I say this because afterward, you have two sub-assemblies which you can actually make do something! With these built the next step is to return to the chassis and continue with the rear suspension build. 

Tuesday, May 21, 2019

Rear Corner Build – Part 1

Having rebuilt the prop shafts and installed new races and bearings into the hub carries, it is now time for an initial fitment of the rear end. The plan here is firstly to check that all the parts go together, but also to get an idea of how many spacers/shims are required to achieve the desired chamber angle.

Installing the Re-built Hub

I chose to start by installing the rear hub carrier onto the swing arm using the donor lower fulcrum shaft. As is suggested in the manual, it is certainly worth trial fitting the fulcrum shaft through the swing arm by itself, to ensure it fits and there isn’t a significant buildup of powder coat. For these swing arms, it’s true to say the shafts are a tight fit but there is no real excess of paint. With a thin coat of copper grease on the shaft to ease the installation and later removal, the hub carrier was then installed to the swing arm. This job is a little cumbersome as you have to hold the hub at the correct position whilst sliding the shaft through. Gentle taps with a rubber mallet and the job is soon complete. 

Installation of rear partly rebuilt hub onto the swing arm.

Installing the prop shaft

Next, the prop shaft is installed onto the differential. AK suggests that you begin by placing the donor prop shaft spacers between the prop shaft and differential. I can’t help but think this is a strange thing to assume as both the prop shaft and swing arm are new from AK, and so not sure how they can be sure these will be correct(ish). Since my original spacers were different sizes (6.4mm and 6.55mm thickness) I was extra careful to put them back on the correct side. These spacers slide over the bolts on the output of the diff. 

Donor spacers placed back on differential output flange.
The next step is to slide the prop shaft on and secure it in place with the 4 original 7/16" Unf Nyloc nuts. I decided here to add a washer between the nut and the prop shaft flange. The original nuts are used only during the trial fitting stage and will be replaced with new 7/16" Unf Nyloc nuts later when in final assembly. Whilst these nuts could be replaced with the somewhat more interesting Philidas nuts (part number NV607041#, which lead to an interesting morning read about these nuts), AK suggests the Nyloc nuts, so I’m sticking with their recommendation. 

Fitted prop shaft.
Fastening the nuts onto the prop shaft is a tricky process, as there is precious room between the opposing universal joint surfaces and unless you restrain the prop shaft, it will rotate as you tighten the nuts. After much trial and error, I found the easiest way to fastening each nut was it to rotate the prop shaft such that the 'target' nut was just off top center with the spline end of shaft resting on the floor. In this position, I could then use a 7/16’’ socket on a 100 mm extension to fasten the nuts. As you have to repeat this process for four bolts per side, this is certainly the least fun part of this job. 

Bring it all together

Now the splined end of the prop shaft can be passed through the respective rebuilt hub. To aid this, I slowly raised the hub/swing arm on the trolley jack whilst rotating and sliding in the splined end of the prop shaft. The tricky parts of this process are to protect the freshly painted hub carrier and getting the splined surfaces to line up. This is defiantly a cumbersome job where an extra hand would have been useful, but not essential. Once the prop shaft is slide into the hub, it is secured in place with a cone washer (smaller radius inboard) and a ‘special’ 1/16’’ nut (I found out why it is listed a 'special' in SNG manual later, no spoilers yet). Both these parts are taken from my donor car. The special nut is single use only, and so whilst I will use it for setting up the camber angle it will be replaced in final assembly. 

Prop shaft nut with cone spacer/washer.

With the hub installed onto the chassis for the first time, it is time to step back and admire the progress. If only I knew at that point that this would come apart so many more times. 

Hub fastened to prop shaft and swing arm. Resting on a trolley jack.
During my first attempt to fasten the special nut onto the chassis, I must have over tightened it (a good sign for later), as when I finally removed it, I noticed that inside the nut there is an inner coil/spring,  which is now unwinding itself from the nut. This must be another type of locking nut, and I guess what makes it ‘special’ and why it is single use…. 

Prop shaft nuts – over tightened.

Adjustment, Adjustments, Adjustments

With the rear corner assembled, the camber angle of the hub needs to be checked and altered. To do this, the top surface of the hub has to be 150 mm from the top of the chassis rail. This means careful raising of the hub on the trolley jack. I found the best way to measure the required distance was to use my father’s old set square, which luckily had a tongue length very close to 150 mm. I, therefore, placed the main surface on the chassis and raised the hub until it touched the set square. 

Set square used for checking the height. 
With the hub at the correct height, the aim is to ensure the (camber) angle hub is between 0 and 0.5 degrees (top of the slightly inboard) from the vertical. This angle of the hub is altered by changing the shims between the differential and the prop shaft. The concept being the thicker the shims, the more it pushes out the top of the hub. As with the front corner, I used an app on my phone to check the angle. For completeness, I used my spirit level, as, after all, I was going for near (or just off) vertical. 

On the off side, I found that with the original shim in place, the top of the hub was several degrees out beyond vertical. To resolve this, I took the entire assembly apart and reconstructed without the donor shim in place. This seemed to create almost the desired angle of 0.4deg.

The gap between the prop shaft and output flange

To verify the thickness of the desired spacer, again dismantled the corner and begun to fill it with 1 mm thick washers. The washers fitted nicely between the recessed region of the mounting plate and the bolts. I found these were a nice tool for experimenting with different shim thickness. Whilst I was not able to obtain the final shim thickness required, I was able to get a range of thickness in which I would find the desired angle. This should help determine how many shims I need to order from SNG. 

Differential output flange with washers to approximate the required shims.
Repeating the re-assembly process multiple times, with each time carefully checking the height of the hub, you can eventually get close to the correct angle.

Double checking the camber angle with a spirit level on the off side.

Final outcome

Having repeated this long process on both the off and near side, I ended up with an idea of what size shims I needed to purchase. 
  • offside required no additional shims for spacing
  • near side required between 5 mm and 6 mm of washers
Whilst I do not need any shims to get the correct camber angle, speaking with AK, they suggested filling the gap between the differential output plate and the prop shift with shims. I guess this is to spread the load onto the prop shaft, rather than relying on solely the pins. 

To achieve the required thickness on the near side, I might be able to get away with using the original donor shim. Whilst this might make things easy, I may consider buying some shims for this side so I have some flexibility when it comes to final fitment.

Now that I have an idea of what size shims I require there are several options to consider. 
  • Speed sensor rotor (CAC8713) which has a 1 mm thickness for £13.99. The actual speed sensor part is not required for the AK build.
  • A range of thicker spacers who’s part numbers are CBC4806xx, where the last two 'xx' are the thickness in mm, for example, the 5.5 mm spacer is part CBC480655. These parts varying costs but between £30 and £55, which are eye wateringly expensive for what they are.
  • Rear Camber Shim 0.020’’ (or approx. 0.5mm in useful units)  is part number C16621# and are 50p each.
Based on the prices and a recommendation from AK, I decided to go for the rear camber shims. So I added an order for 16 to my growing SNG basket. This order will also include the rear hand brake shoes, which will allow me to finish the assemble to the rear hubs prior to the final rebuild of the rear.

Sunday, March 24, 2019

Re-Painting the Hub Carrier

This post is less about starting a new job or finishing old tasks, but more about fixing a painting mistake on the rear hub carrier. Luckily Mark had already spotted this error and explained a better way of painting cast aluminum, which in hindsight I believe would have resolved this problem. The one downside to this was that due to my slow posting on this blog, Mark’s response to my original painting post came just after I had spent another weekend working through the steps below to fix the issues. Still, I did explain why I had observed the painting issues, which put my mind at rest. Importantly as this post will show, this problem was easily resolved with filling and re-painting.

Flaky Paint

Due to Christmas holidays, several weeks (maybe a month or so) went by between me painting the hub carries and then looking at them again. When I did, I noticed that the paint, where the splash shield fastens, was starting to peal. More concerning still was that this issue was visible on both hub carriers. It only seemed to be in this small region, which I guess is because it’s these areas which had the greatest amount of corrosion, and I didn’t manage to remove it all. 

Flaky paint on the rear hub carrier. 

Flaky paint initially sanded off.

Filling down and re-painting

A quick rub with sandpaper removed the large flaky parts. Although all the loose paint had been removed, I suspected that the problem would keep coming back unless I followed a more aggressive sanding approach. Doubting that I had not removed all of the corrosion, I, therefore, began filling down the entire flat area to remove as much of the corrosion as I could. Plenty of partially corroded aluminum quickly came off, further highlighting the error in my earlier ways. Lots of filling later, the surface was looking a lot better, although still with some deeply corroded recesses. Whilst I was able to get it looking a lot better than the image below, I was not able to remove all of the deep regions. 

Partially filled down hub carrier.
To avoid a repeat of the flaky paint, I then decided to seal this surface using POR 15. After carefully masking up the freshly installed bearings, I applied two coats of POR15 to the affected area. 

Preventative coating of POR15 on the affected area. 
After leaving this to dry, it was then time for a fresh coat of grey primer before a top coat of Arctic Silver. When spraying the primer, I used extra newspaper around the carrier to avoid getting too much overspray on the rest of the hub. 

Hub carrier, outside ready for first coat of primer. 

Hub carriers after the primer is applied.

After all this work is said and done, the final part looks as good as it did before. I don’t think you could tell that it has been partly sanded back and re-sprayed. 


Re-painted hub carrier.

The Cause

As I said at the start of this entry, Mark did explain the potential cause for why this had happened, all before he knew I had encountered a problem. The explanation was that cast aluminum is slightly porous, with containment and gasses trapped inside. To avoid this reacting with your paint, it is recommended that you place the part in an oven for 30 minutes to extract these contaminants/gasses before painting. It was this oven step, which I missed when I originally painted the carriers.

However, remember, I did put the painted carries into the oven, to allow them to expand when installing the races. I suspect this resulted in the same expansion and extraction gasses/containments from the aluminum, although this time they reacted with the paint which leads to the flaking. Although I learned of the correct approach after fixing the original problem, I’m hoping the POR15 will provide an adequate seal. I will keep a close eye on this area over the coming months and years, in case further action is required. 

Looking back, I am glad this happened, as I would never have learned about the need to degas cast aluminum parts before painting. I’m sure I will continue to make mistakes and go back and fix them! So, if anyone does spot other errors in my work, please leave a comment below, im always happy to learn from my mistakes (It certainly happens enough).

Sunday, March 10, 2019

Rear Hub Carrier - Rebuild

Having installed the differential and the swing arms, the next step is to build up the rear hubs so they can be mounted to the swing arms. In a previous post, I covered the strip down, cleaning and painting of the rear hubs and their carriers. In this post, the aim is to install the new races and bearings into the bare hub carrier. 

Freshly painted rear hub carrier.


Race Installation

The process of installing the races into the rear hub carrier is the same as that on the front. This being to use an old race with a slit cut into it and then a lump hammer to drift the new races into place. When I began to install the races, it was apparent that they are a slightly tighter fit than those on the front hubs. To aid the installation, I enlisted the help the kitchen oven to heat up and expand the aluminum casting. As I had never done this before, I was worried about applying excessive heat and warping the aluminum parts. I therefore gradually increased the oven temperature in stages starting at 80 degC and testing fitting the races after 30 mins in the oven. I finally ended up setting the oven to 120 degC. Of course with numerical simulation tools like COMSOL Multiphysics (the company which I currently work for), I could have predicted the expansion with a numerical model far more quickly. However, that sounded too much like work and so I chose instead to pick up the hammer and do the physical experiment!

Rear hub carrier in the kitchen oven. Such an odd sight!
With the little extra room, the outboard race easily drifted in. One thing to note, due to the considerable depth at which the outboard race sits, I had to use a pair of old races to drift the new race in. This is shown below, where three races are shown; the new race (barely visible), an upside down old race with a slot cut into it, and another old race sitting on top. It was here where the cut out in the old race really became useful.

Selection of old races being used to drift the new outboard race into place.
As before, when the tone of the impacts change the new race is home. Leaving you with this lovely view.

New outboard race installed.
The inboard race however proved a lot more difficult to install. This is mainly due not being able to impart much force onto the race due to the high sides of the carrier itself. Luckily, I was able to use the top of the hammer to gently drift the race in, with little taps. As a result, this race took almost as much time to install as all of the front races combined. Still, I got the job done in the end and that’s what counts. 

Installing inboard race.

Bearing installation

Now with the new races installed, their respective bearings can be greased up and installed. As with the front bearings, I used plently of grease and made sure to spin the outer casing with respect to the inner casing to work grease into the bearing. 

The final assemly of these bearings into the hub harrier also requires two new grease seals and a pair of spacers, one large and one small, from the donor car (top right in the image below). The order of the parts, from inboard to outbard is as follows: grease seal, bearing, small spacer, a larger spacer (tapped section facing inboard), bearing and finally grease seal. 

Bearing and seals.
To avoid the spacers and bearings falling out as you build up either side of the hub, AK suggests the following method: insert the greased inboard bearing and secure it with its respective seal. Then having turned the hub over insert the small and large spacer in turn. This is then followed by the remaining race and seal. Unlike the front grease seals, both rear grease seals went on without a problem. Just a small tap with a hammer and presto. The rebuilt hub carrier now looks like this.

Seals installed into hub carriers

Rebuilt rear hub carrier. The few marks on the inside of the hub occurred whilst trying to install the new races.

Lower shaft and bearing 

The last part of the rear hub carrier which needs rebuilding are the lower fulcrum bearings. This comprises of two sets of races and bearings connected with a metal tube. These bearings are held in place with an integral grease seal and a large washer/spacer. In a previous post, I have removed all these components, given them a thorough cleaning and inspected them for excessive wear. When I inspected the cleaned parts, they appeared to be in good condition and so decided to reuse them. When reusing bearings, be extra careful to ensure you remember which races belongs to which bearing. Don’t mix races/bearings when re-building the hub as this increases the wear on these parts.

As with all parts to this cobra story, the first step is to layout the require parts. 

Cleaned parts ready for being re-installed.

As I am not replacing these races or bearings, this process is very quick. Slide one of the re-greased bearings onto the fulcrum tube and then pass this through the hub carrier. Then the opposing bearing can be slide onto the other end of the tube, which should now be exposed on the opposing side of the hub carrier. 

Re-greased bearing.

With the bearings in place, there should be a small amount of the fulcrum tube exposed which the spacers/washers can be slid over. Then with this all assembled and placed on its side, a few very gentle taps with a hammer can be applied to ensure the integral seal finds its home. 

Installed bottom bearing.

Final components 

With the hub carrier rebuilt, the final step is normally to install the brake shield and handbrake shoes. However, when I got to this stage I hadn’t ordered these parts yet. I am planning another order with SNG which will include amongst other items the rear brake rotors and pads and the required half shaft spacers/shims. However, before I can order the half shaft shims, I need to have an idea on how many and what size of shims I require to achieve the desired angle. For this, I need to install the hub with its carrier and the half shafts onto the chassis. Therefore, the plan now is to skip past the handbrake assembly and just push the hub shaft through and secure it in place with the ABS ring. I can, with the correct pullers, easily separate these parts again later to easily fit the handbrake mechanism. This is certainly starting to feel like a habit: do the work once, pull it apart and repeat two or three more times. 

With handbrake step omitted, the hub can be slid into the carrier and secured in place with the ABS ring. Some gentle percussive persuasion is required to mate these parts together. 

Assembled hub carrier with hub and ASB ring.

Of course, this entire blog entry is then repeated on the other side, but apart from the inboard race, it’s not such a long task. Before these parts are installed onto the chassis, I have to first assemble the half shafts, and that will be in the next post.

Tuesday, October 30, 2018

Rear Hub Removal

With front hubs and brakes removed, I turned my attention to the rears. From the outset, this looks very similar to the front brakes, so should be easy. 

Rear corner assembly – before starting

Rear disc brake removal

The removal of the rear brake calipers and discs is almost identical to the front corners. Therefore only a summary of the steps is given below.

To remove the calipers undo the two allen headed bolts located at the back of the disc, which are contained within separate rubber tubes. With the calipers removed, the brake pads can easily be removed, or watch them fall out. The caliper carrier is fastened to the hub by two 15 mm bolts. The difference with the rear is that unlike the front these bolts have been wire locked together. Not sure why only the rears get this treatment, especially as the front brakes are more powerful. Now that the brake assembly is removed, the rear corner looks like this.

Image from the back of the IRS with the caliper carrier removed

Rear disc with the disc brake assembly removed

Not unsurprisingly the rear brake calipers are considerably smaller in size than the front brakes. They are however equally rusty and dirty, so will need a good clean. 

Both rear brake calipers and carriers
With the caliper carrier removed the disc can be removed by removing the grub screw. The grub screw on the near side was very difficult to remove, as the screwdriver head kept slipping. I did manage to get them out before totally stripping the head, but only just. These will certainly be replaced!

With the rear brake pads and discs removed, it is clear these are not in the same good condition as the front. As the images below show, there is significantly less meat on the pads and the discs have a very pronounced lip. Certainly, these will need to be replaced when building up the rear suspension on the AK chassis.

Rear brake disc and pad. Very little meat left

Notice the rim on the rear brake disc


Rear handbrake pads

Now that the rotors have been removed, I was slightly shocked to see that the handbrake is operated by internal drum brakes. Who would have thought that even in the 1990’s drum brakes were still used on Jaguars?

To remove the drum brakes first ensure that the self-adjuster at the top of the hub is fully screwed in. This reduces the tension placed on the pads making them 'easier' to remove. Then there are two NO. no. 5 allen headed clips which are held in place by a spring. These are removed by depressing the clip head and twisting free. With these removed and with a little more wiggling, the retaining springs holding the pads together can be unclipped. After removing one or both springs, the pads fall away from the hub. The last step is to detach the brake cable from the ‘fixing’ plate, by sliding out the middle pin. To avoid losing this small pin, I taped it back into the fixing bracket.

In hindsight, having removed the hub before tackling these drum brakes might have been easier, if possible...

Hub and IRS Removal

Now that all the brakes have been removed, the strip down of the hub and IRS really begins. For reference, I have referred to the following exploded diagram of the rear corner assembly which I found online.

To remove the hub there is a 27 mm nut which fastens the half shaft spline to the hub. These require some serious torque to remove. The near side nut required a week of regular WD40 spraying and then additional weight to resist the lifting of the differential when using the full extent of my up-cycled breaker bar.

With this nut loosened, but not fully removed, a good set of pullers is required to separate the half shaft from the IRS. Leaving the nut on ensures the whole assembly cannot fly off. This is another tip I remembered from Ed China.

Dirty rear hub removed from hub carrier
Luckily, all the races have stayed within the hub, which saved on the mess created. The only part which did fall off was the cogged wheel, which I believe is used by the ABS sensor to detect a differential wheel speed. This seems to be a press fit against the outside surface of the hub shaft and helps secure the hub within the IRS.

With the hub removed, I foolishly undid the IRS fulcrum shaft. This nut came loose relatively easily using the large breaker bar and the shaft itself came out with some persuasion. With the IRS away from the swing arm, the handbrake cable can now be removed. This is held in place by a semi-round plastic clip which sits just behind the hole for the handbrake cable. By rotating this clip, so its cut out is facing upwards you can gently pull this clip off.  Now the cable should just pull out from the IRS.

Inside view of the rear hub carrier
I then planned to remove the splash shield. This is fastened to the IRS with 4 no. 8 Allen headed bolts. These are obscured when the hub was fitted. However, there is a small cut out in the hub, which I assume is there to gain access to these bolts, but it is far too small for my sockets. I found the best way to remove them was to put the IRS back onto the lower swing arm, which prevented any rotational movement as I used my smaller breaker bar with an Allen key slotted inside to loosen them. With these four bolts removed the shield falls off from the IRS.

Removal of the rear splash shield
Now the shield is off, I can again remove the IRS from the swing arm. Having separated the major components from the rear swing arm, my work on this corner is done for now.

The layout of the disassembled rear corner
I will tackle the further breakdown of the half shafts and the hub carrier later.